End-to-End Testing with Insomnia API Client


End-to-end (E2E) testing is a critical part of ensuring the quality and performance of modern applications. When working with APIs, having an efficient and effective way to document, test, and automate those tests is essential. Insomnia, an API client typically used for API testing and debugging, offers a robust way to not only manage API documentation but also build and execute test suites. Paired with the Inso CLI, Insomnia can be integrated into your CI/CD pipelines for automated E2E testing.
In this post, we’ll walk through creating E2E tests using Insomnia’s API client. We’ll start by documenting the API endpoints, adding a test suite using JavaScript, and then demonstrating how to run the tests using the inso command-line tool. Let’s dive in!
Step 1: Document Your API in Insomnia
Before diving into testing, we first need to document the API endpoints in Insomnia. This is straightforward and provides a great foundation for building automated tests.
Creating a New Document
- Create a New Document: In Insomnia, click on the “Create” button and select “New Document”. This will serve as the base for your API’s documentation.
- Add API Endpoints: Once the document is created, start adding your API endpoints. You can either:
- Manually add the endpoints (HTTP methods, headers, body, etc.), or
- Import from an OpenAPI (Swagger) specification if you already have it.
Insomnia makes it easy to organize your API structure, helping you keep everything in a single location for both documentation and testing.
You could also use environment variables as I explained in another article.
Step 2: Create a Test Suite in Insomnia
Once your API is documented, you can add test suites directly within Insomnia using JavaScript. Each endpoint can have its own test logic, which will execute automatically after the request is made.
Adding Tests in Insomnia
To create tests:
- Open an API request you want to test.
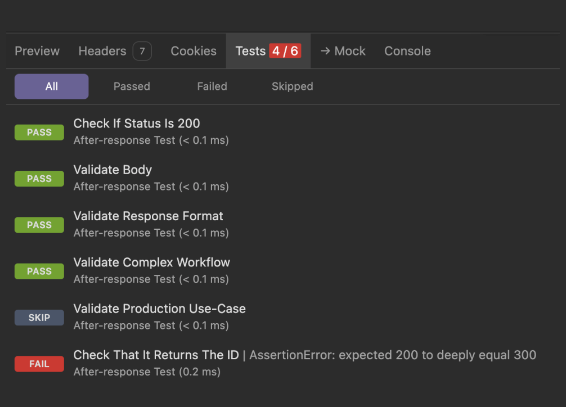
- In the right-hand panel, you’ll see a Test tab next to the Response tab. Click it.
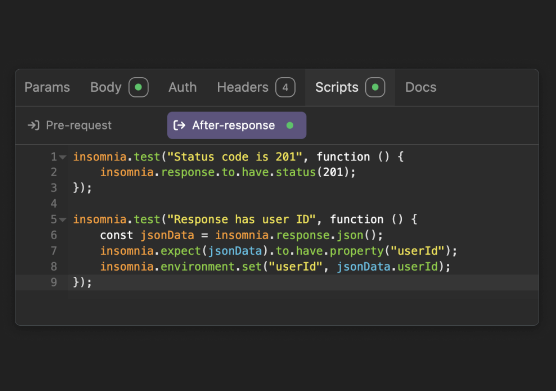
- Write JavaScript test assertions based on the response you expect from the API.
Here’s a simple example of a test suite for an API endpoint that returns a list of users:
// Expect response status code to be 200
insomnia.test("Status code is 200", async () => {
  const response = await insomnia.response;
  insomnia.assert(response.status === 200, "Expected status code to be 200");
});

// Expect response to be in JSON format
insomnia.test("Response is JSON", async () => {
  const response = await insomnia.response;
  const contentType = response.contentType();
  insomnia.assert(contentType.includes("application/json"), "Expected response to be JSON");
});

// Validate the structure of the JSON
insomnia.test("Response contains a list of users", async () => {
  const response = await insomnia.response;
  const jsonData = await response.json();
  insomnia.assert(Array.isArray(jsonData), "Expected response to be an array");
  insomnia.assert(jsonData.length > 0, "Expected user list to contain at least one user");
});

// Check that the first user has a 'name' property
insomnia.test("First user has a name", async () => {
  const response = await insomnia.response;
  const jsonData = await response.json();
  insomnia.assert(jsonData[0].hasOwnProperty('name'), "Expected first user to have a 'name' property");
});
Here, insomnia refers to the Postman-like Insomnia testing object that allows you to make assertions on API responses. You can expand this with more complex logic, including testing different response codes, validating error responses, etc.
Step 3: Export the Document for Inso CLI
After building and testing in the Insomnia UI, you can export your workspace for running tests via the command line using the Inso CLI.
Exporting the Workspace
- In Insomnia, navigate to File → Export Data.
- Select the format you want (JSON is common) and export the data.
- Save the exported data into a directory in your project. This directory will be referenced when running tests via
inso.
Step 4: Running Tests with Inso CLI
Now that you’ve exported your workspace, it’s time to automate the tests using the inso command-line tool. The inso CLI can run tests, lint OpenAPI documents, and much more. Here, we’re focusing on running tests in a headless environment (great for CI/CD).
Installing Inso CLI
First, you need to install the inso CLI if you haven’t already.
Running Tests
With inso installed and your workspace exported, you can now run the tests from the terminal:
inso run test [identifier]
The identifier here could be the name or ID of your document or test suite. The tool will prompt you to select a unit test suite and environment.
Here’s an example of running tests against a specific document:
inso run test "My API Document" --env "Development"
In this case, My API Document is the name of your document, and Development is the name of the environment (you can define multiple environments like Development, Staging, Production, etc.).
Common Inso CLI Options
Abort on first failure (bail):
inso run test "My API Document" --bail
Run tests matching a name pattern:
inso run test "My API Document" --testNamePattern "Status code"
Use a specific reporter (the output style of the test results):
inso run test "My API Document" --reporter progress
Choose a specific test suite:
inso run test "My Test Suite" --env "Development"
Specify an environment:
inso run test "My API Document" --env "Development"
Example Output
Here’s an example of the output you might see after running inso:
$ inso run test "My API Document" --env "Development"
Running tests for My API Document...
✔ Test Suite: Users Endpoint
  ✔ Status code is 200
  ✔ Response is JSON
  ✔ Response contains a list of users
  ✔ First user has a name

All tests passed! 🎉
If any test fails, inso will report the failure and exit with a non-zero code, making it easy to integrate with your CI/CD system.
Conclusion
When you’re working with legacy code or an environment with cross-imports that make traditional E2E testing difficult, leveraging Insomnia as both a self-documented API tool and a test automation framework is a game-changer. With its intuitive interface for adding API endpoints and test suites, combined with the power of the inso CLI, you can create robust and flexible E2E tests for your APIs with ease.
By following the steps outlined here, you’ll have a simple but powerful setup for creating and running API tests. Whether you’re manually running tests during development or automating them as part of your CI/CD pipeline, Insomnia’s test framework will help ensure your APIs remain reliable and high-quality.
Happy testing! 🎸


